This article explains the steps to remove startup programs in Windows 11 so that you can get a faster boot every time. Whether you want to disable one or all startup apps on Windows 11 or Windows 10, you can follow the same tutorial.
Like Windows 7, Windows 8.1, and Windows 10, Windows 11 also adds programs automatically at startup. These selected apps start automatically when you turn on your computer and log in to your user account. If you have one or two apps at startup, you might not find any problem. However, you might find a very slow startup or increased boot time if you have dozens of apps and not-so-good hardware. Therefore, to make the startup or boot faster, you can disable startup programs in Windows 11.
How to Remove Startup Programs in Windows 11
To remove startup programs in Windows 11, follow these steps:
- Right-click on the Start menu or press Win+X.
- Select the Task Manager from the WinX menu.
- Switch to the Startup tab.
- Select an app you want to remove from startup.
- Click the Disable button.
Let’s check out these steps in detail to learn more.
At first, you need to open the Task Manager on your computer. There are multiple methods to do that. However, you can use the WinX menu to get the job done. To do that, right-click on the Start Menu or press the Win+X keyboard shortcut.
After that, select the Task Manager from the list. Alternatively, you can press Ctrl+Shift+Esc to open Task Manager on your computer directly.
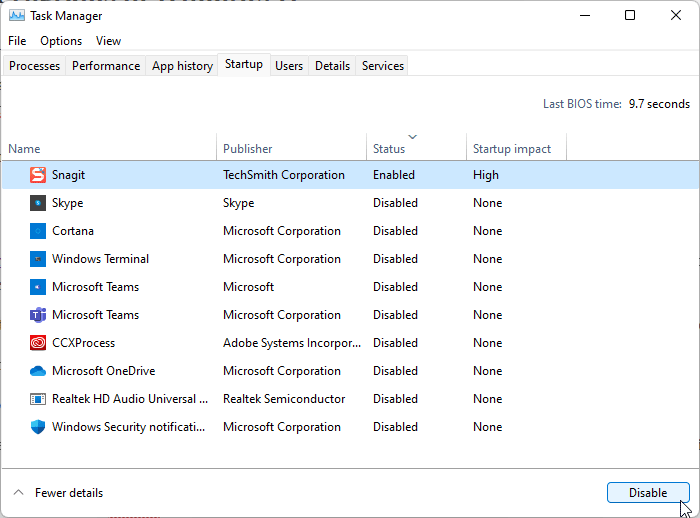
By default, it opens the Processes tab. You need to switch to the Startup tab.
However, if you cannot find it, click the More details button and click on the Startup tab.
Here you can find all the apps that are/were assigned to the startup. Find an app with Enabled status and click on it to select. Then, click the Disable button to remove it from the startup in Windows 11.
That’s all! From now onwards, the disabled app will not run at startup.
How to Disable Startup Programs in Windows 11
To disable startup programs in Windows 11 using Windows Settings, follow these steps:
- Press Win+I to open Windows Settings.
- Go to the Apps section.
- Click on the Startup menu on the right side.
- Select an app you want to disable.
- Toggle the respective button to remove it from startup.
To get started, you need to open the Windows Settings. For that, press the Win+I keyboard shortcut or open the Start Menu and click the settings gear icon.
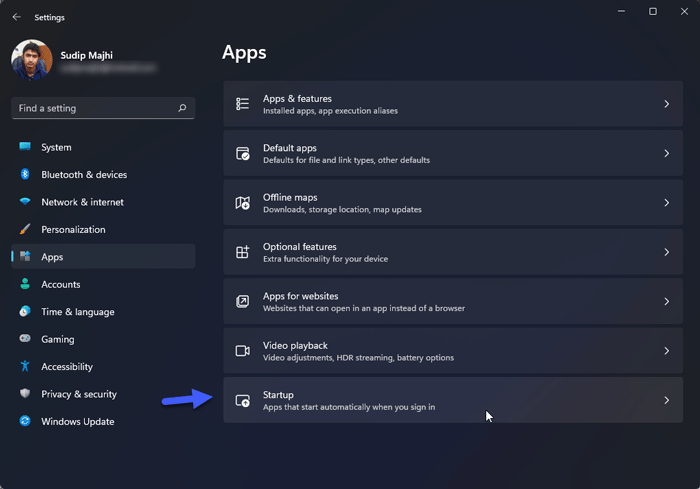
Next, switch to the Apps section on the left side and click on the Startup menu on the right side.
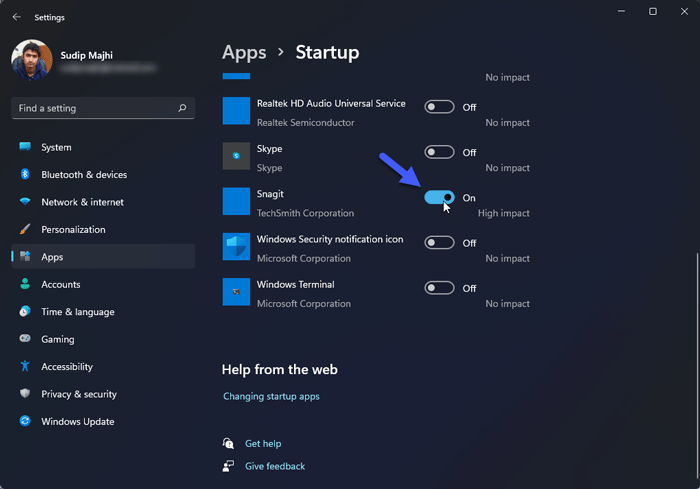
Here you can find all the apps that run automatically during startup. If the button is blue or it says On, the selected program runs at startup. If you want to disable the app, you need to toggle the switch.
That’s all!
How Do I Disable Startup Programs in Windows 11?
There are two ways to disable startup programs in Windows 11 – using Task Manager and Windows Settings. In the Task Manager, go to the Startup tab, select an app you want to disable, and click the Disable button. In the Windows Settings, go to the Apps > Startup, and toggle the respective button to remove it from startup.
How Do I Remove Programs From Startup on My Computer?
To remove programs from startup on your computer, you need to use the Task Manager. Press Ctrl+Shift+Esc to open the Task Manager and go to the Startup tab. From here, you can select an app by clicking on it once and click the Disable button. However, the same thing can be done using Windows Settings > Apps > Startup.
Can I Disable All Startup Programs in Windows 10?
To disable all startup programs in Windows 11/10, you need to take the help of Task Manager or Windows Settings. Although there is no direct option to remove them all at once, you can disable them one at a time. Either way, you can find all the apps that are assigned to run at startup. You can remove them all using the aforementioned guide.
That’s all! Hope this guide helped you disable or remove startup programs in Windows 11.
Read: How to open elevated Command Prompt in Windows 11/10


